Create an App
To build a WhatsApp bot, first, you have to connect your bot to BotSilor. And to connect your bot, you have to create an app for WhatsApp.
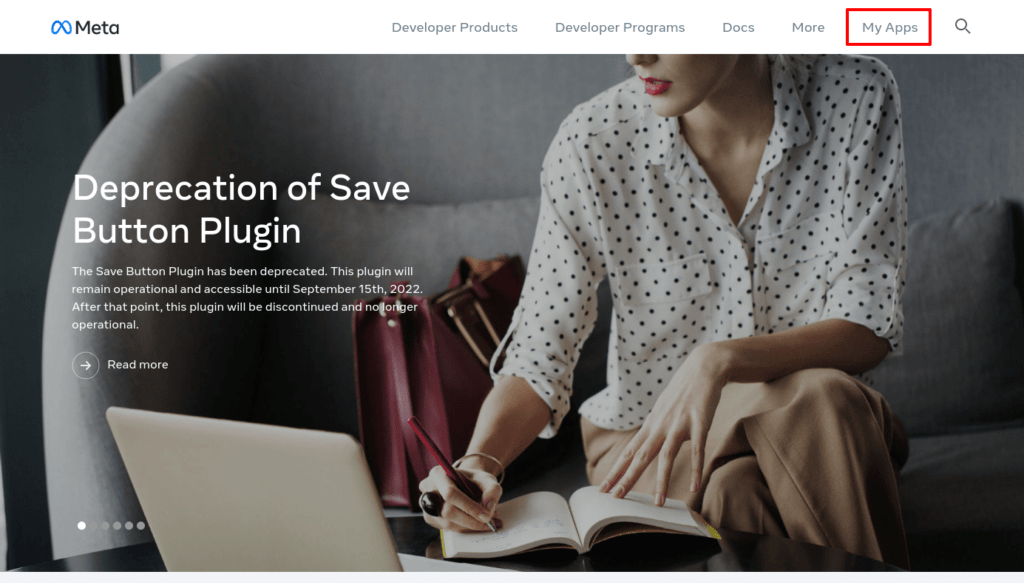
To create an app, go to developer facebook . And click on the My Apps tab on the page.
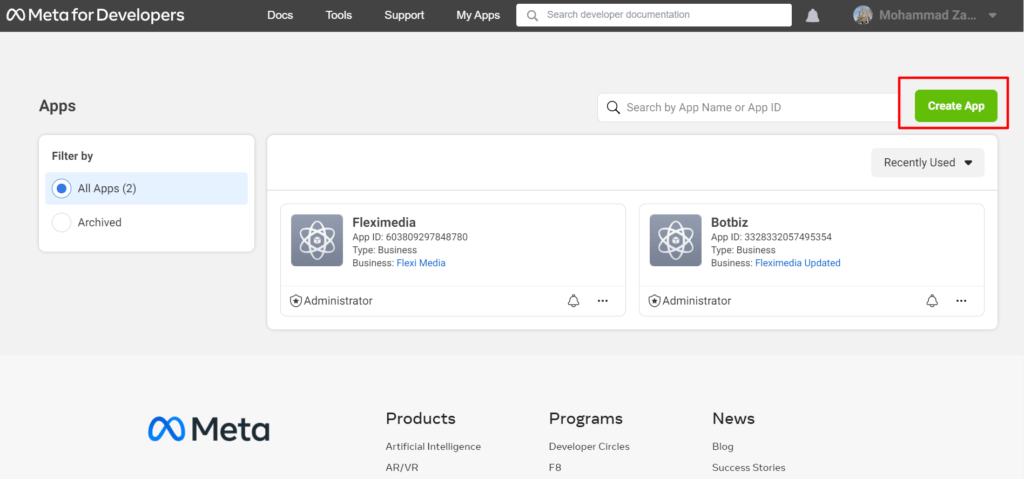
Instantly, a page will appear with a Create App button and all your predefined apps.
Click on the Create App button to create an app.
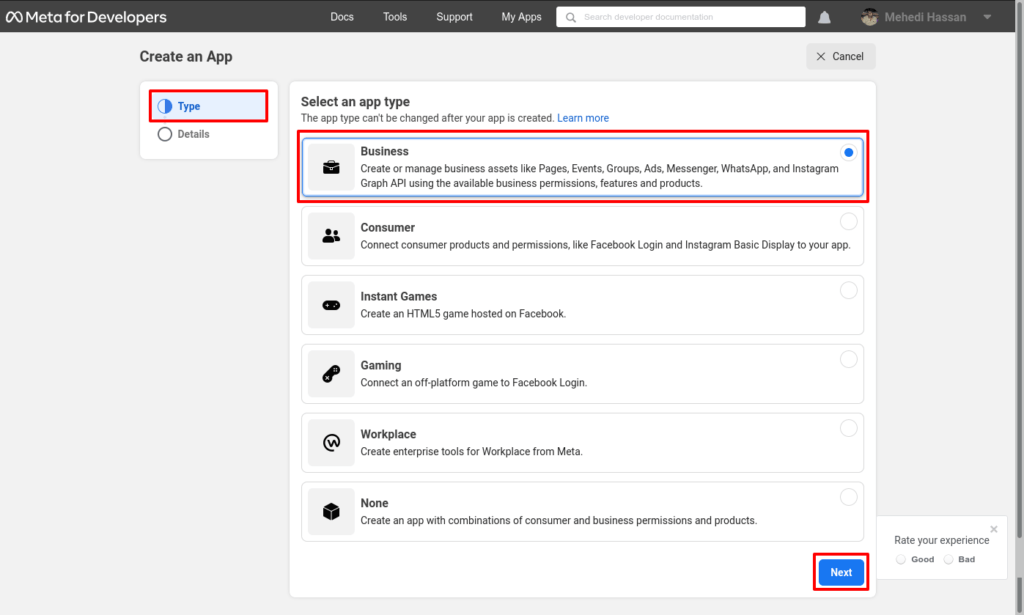
Instantly, a page called Create an App will appear with a list of app types. And from the list of app types, you have to select a type. Select Business as your app type. Then click on the next button.
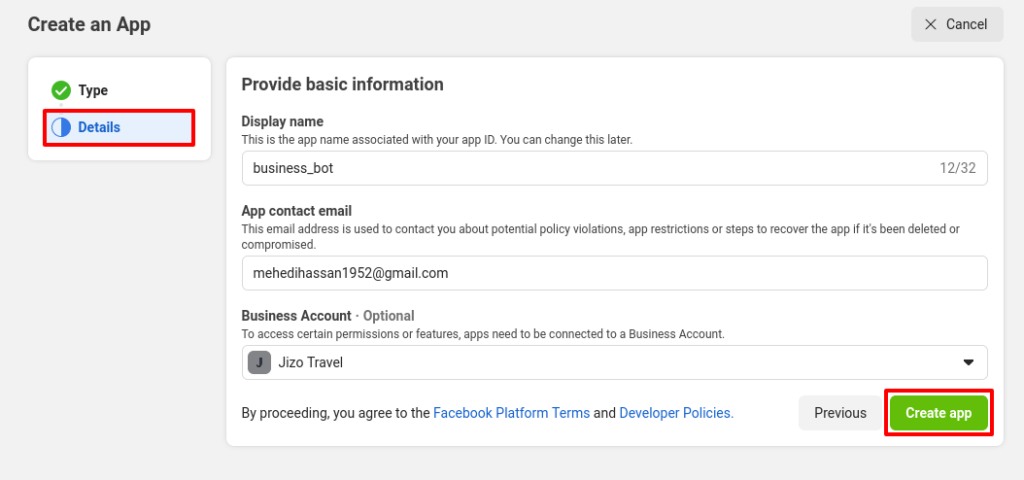
And a form will appear and you have to fill out the form by providing the basic information.
In the Display name field, add a display name for your business account. In the App Contact Email field, provide an Email address.
In the Business Account field, you can select a Business account. Click on the Field, and a list of predefined Business accounts will appear. And from the list, you can select a Business account. Anyway, the field is optional.
Now click on the Create App button.
Instantly, a pop-up form will appear with a password field. And in the password field, you have to re-enter your Facebook password. After re-entering your Facebook password, click on the submit button.
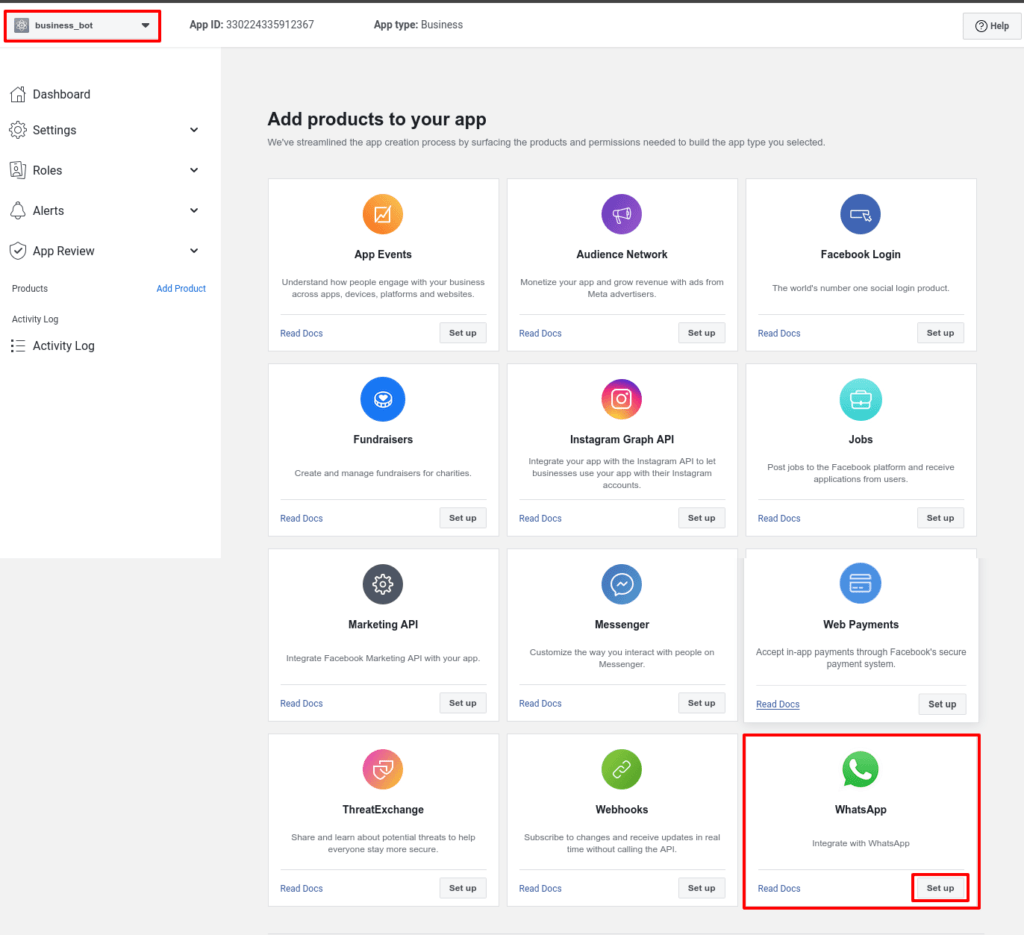
Instantly, the product page will appear. On the page, you have to add a product to the app.
Since you will create an app for a WhatsApp business account, you have to add WhatsApp to the app.
Scroll down the page and you will see the WhatsApp section. Now click on the setup button of the WhatsApp section.
Instantly, the Getting started page will appear. In the temporary access token field, you will get a temporary access token that will expire in 23 hours. You would better not use the temporary access token.
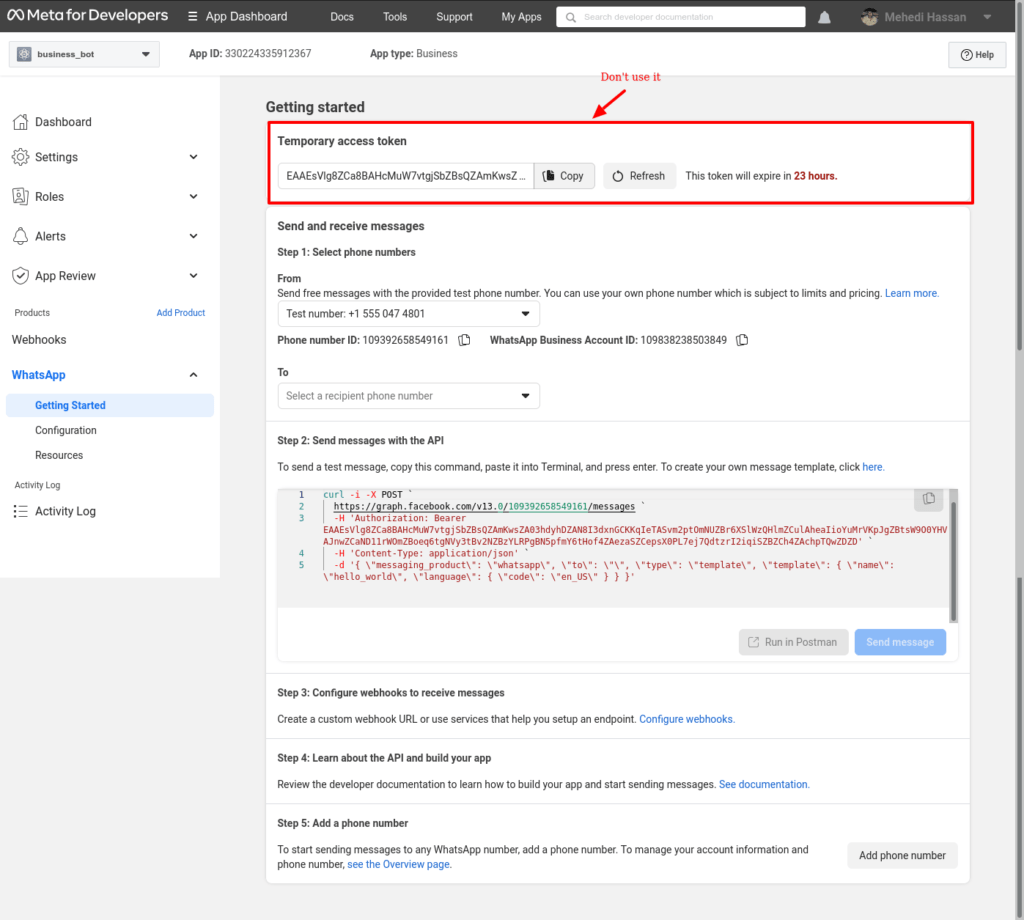
You can also refresh the token by clicking on the refresh button. If you connect the bot with the access token, the bot will last only 23 hours. You can use the temporary access token for testing purposes. I suggest you not to use a temporary access token.
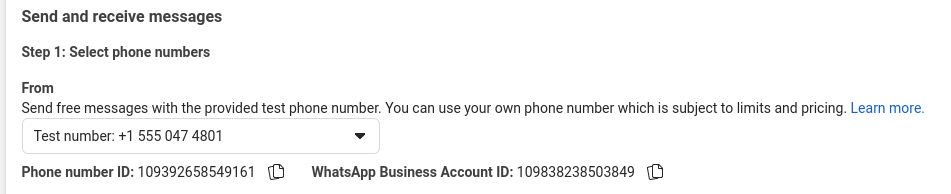
In the selected phone number section, you will see the phone number ID and WhatsApp business account id. And to connect to the bot, you need the WhatsApp Business Account ID.
Add phone number
Now you have to add a phone number for the bot and verify it. To add and verify a phone number go to the step-5 section called Add a phone number.
Now 5 and click on the Add phone number button.

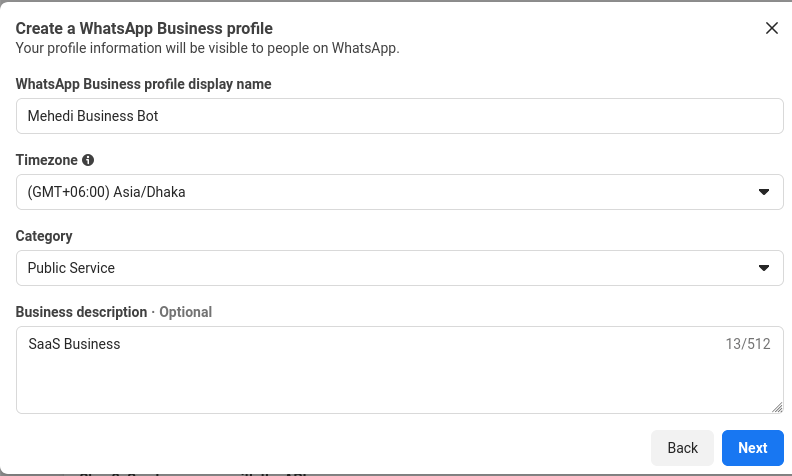
And instantly, a modal form will appear. In the form, you must provide profile information that will be visible to people on WhatsApp.
In the WhatsApp Business Profile display name, you have to provide a display name. Then in the Timezone field, select a timezone. Then select a category of your business in the Category field. Click on the Category field and a drop-down list of the different categories will appear. And from the list select a category.
Then you can write your business description — the field is optional, not required. Then click on the next button.
Instantly, a modal form will appear with a field called the phone number. And in the Phone Number field, you have to provide your phone number. After that, you have to choose how you would like to verify your phone number — via text message or Phone call.
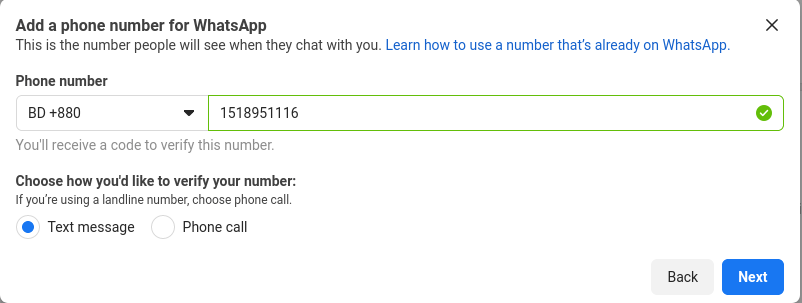
Well, after providing your phone number and choosing the verifying option click on the next button.
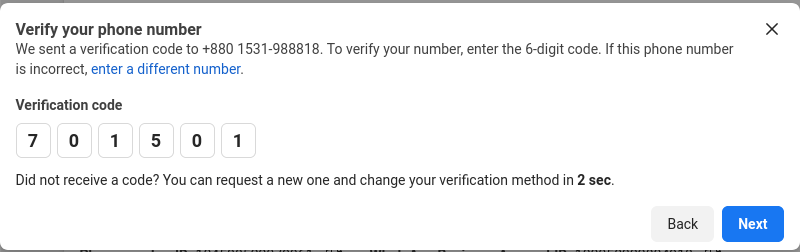
Then, you have to verify your phone number.
Configure Webhook
Now, you have to configure the webhook to receive messages. To configure webhooks, go to step 3 and click on the Configure webhooks button.

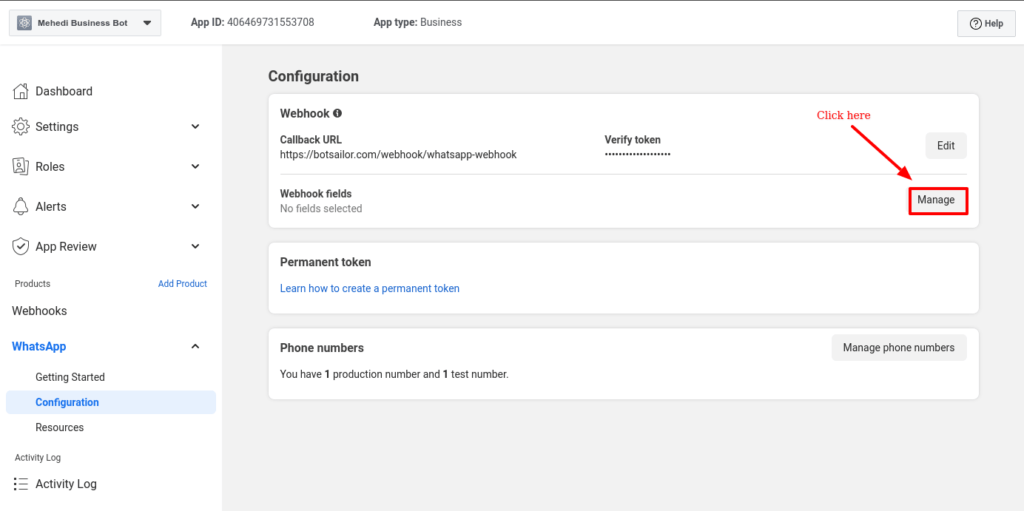
Instantly, a page called Configuration will appear.
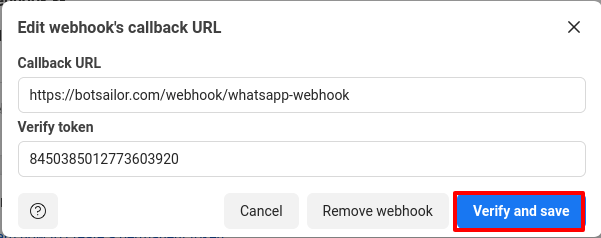
In the webhook section, you will see an edit button. Now click on the edit button.
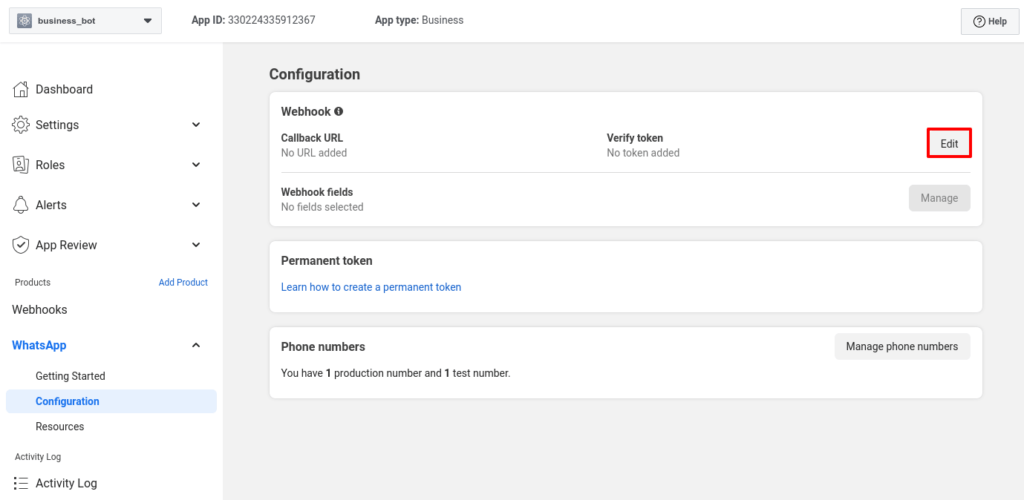
Instantly, a pop-up form will appear with two fields — Callback URL and Verify Token. Now you have to provide a callback URL and verify the token.
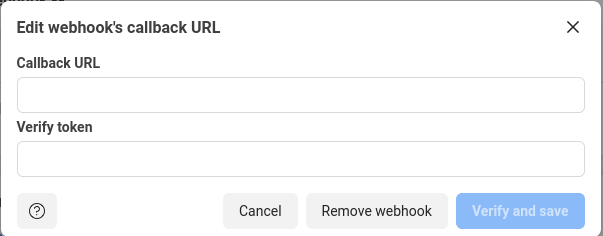
To get the callback URL and verify the token to Botbiz.app. Login to your account and go to the dashboard of Botbiz. At the left sidebar of the Dashboard, under the WhatsApp section, you will see connect WhatsApp option. Now click on the connect WhatsApp menu and instantly, Connect WhatsApp Business page will appear.
At the top of the page, you will see Webhook Callback URL and verify token. Copy them and return to the Configuration page of developer facebook.
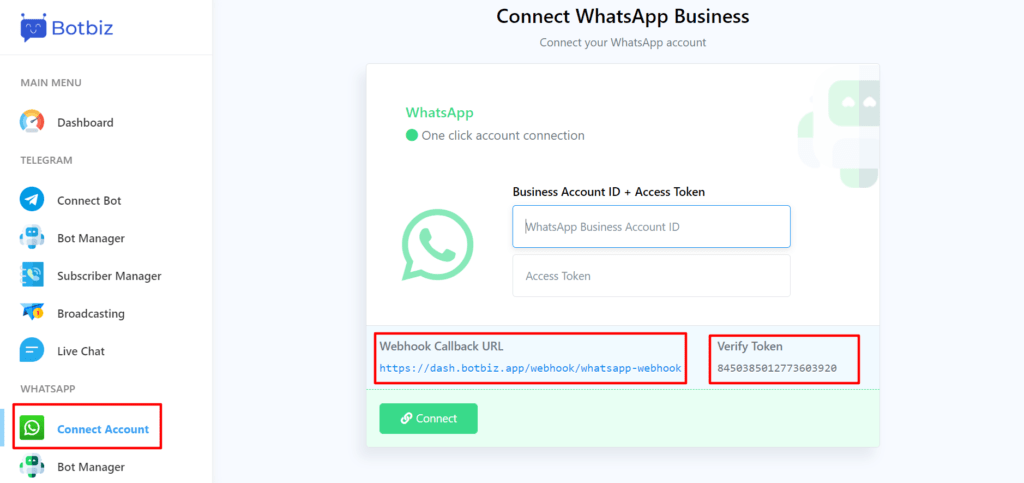
Then paste the Webhook Callback URL and verify token in the callback URL and verify token fields respectively. Now click on the verify and save button.
Now you have to select webhook fields. To select webhook fields, click on the Manage button.
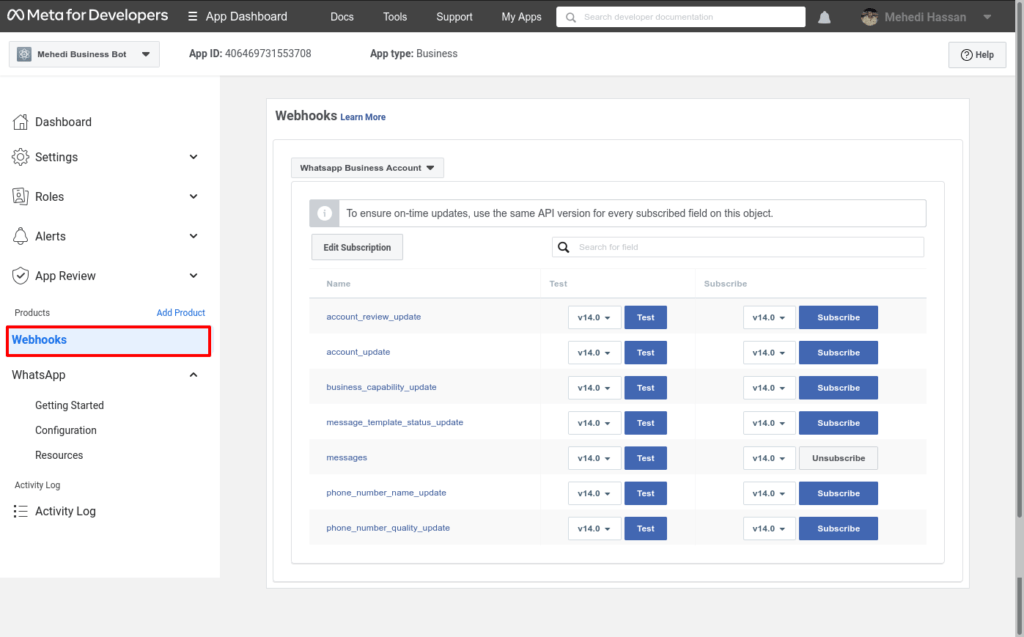
Instantly, a pop-up modal will appear with some webhook fields. Now subscribe Message webhook field. Now click on the Done button.

You can also subscribe and unsubscribe to webhooks on the webhooks page. Click on the webhooks menu and the webhook page will appear with some webhook fields. On the page, you can subscribe to and unsubscribe to any webhook field.
Now return to the Getting started page by clicking on the Getting Started menu on the left sidebar of the page.
Collect Access Token
Now you have to collect a permanent access token to connect your bot.
In the step 5 section, click on the see the overview page button.

Instantly, you will be redirected to the overview page of the business Facebook site.
On the overview page, click on the menu button and the left sidebar will be expanded with all tools. Now click on the Business Settings.
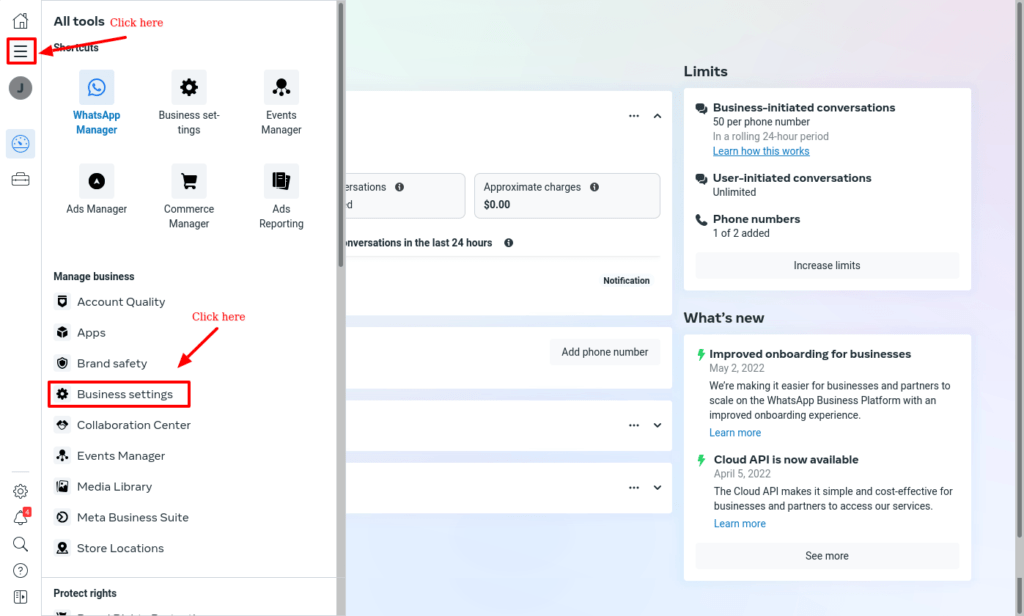
And you will be redirected to the Business settings page.
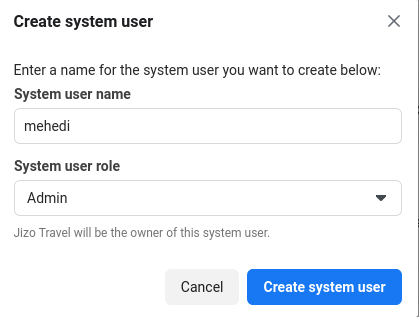
Now you have to create a user. To create a user, first, you have to select System user in the left sidebar of the business setting page. Now you have to add user by clicking on the add button.
Just as you click on the Add user button, a pop-up form will appear with the system user name and role field.
In the system user name field, give a user name, and in the system user role field, select a role — employee or admin.
If you want to add a user as an employee, select employee. On the other hand, if you want to add a user as an admin, select admin.
Then click on the create system user button. And it will create the user.
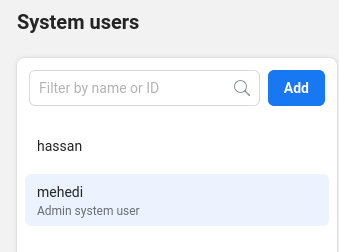
After you have created a user, the user will be available in the list of users.
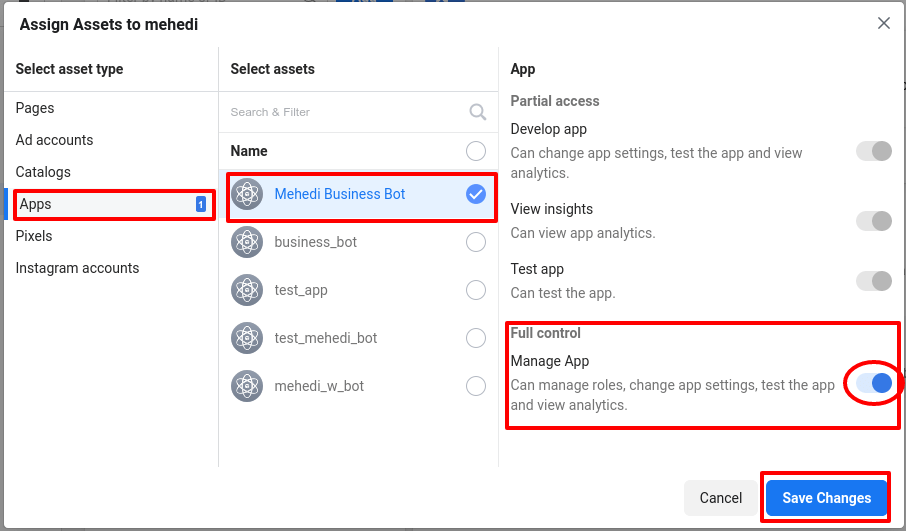
Now you have to add assets for a user. To add assets for a user, select a user and click on the Add Assets button.

Instantly, a modal will appear. From the Select asset type section of the modal, select the Apps menu. Now select the app to which you want to assign assets. Then give permission. Here I permit Full control by enabling the radio button of the Full control option. Now click on the Save changes button.
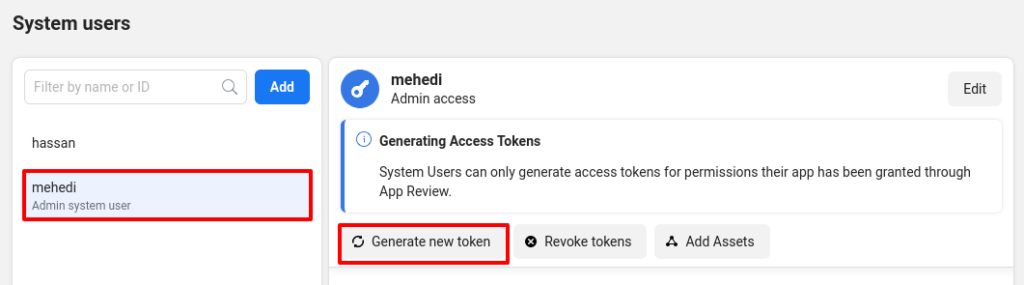
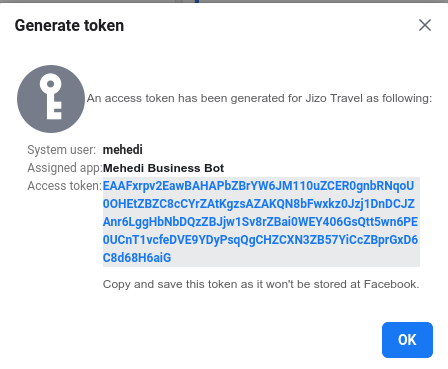
Now you have to generate an access token. To generate an access token for the user click on the Generate new token button.
Instantly, a modal form will appear with a field called select app. Now click on the select app field, and the drop-down list of your apps will appear.
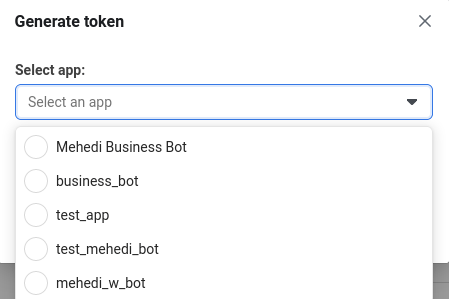
Now select an app.
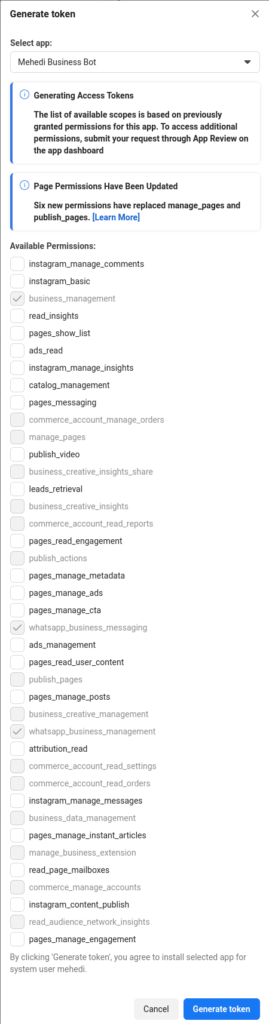
Then a list of available permission will appear. From the list, you have to select Business management, WhatsApp business messaging, and WhatsApp business management. Now click on the Generate token button.
Instantly, a modal will appear with an access token. Now copy and save the access token.
Now go to the dashboard of Botbiz.app In the WhatsApp section of the left sidebar, click on the connect WhatsApp menu. Instantly connect WhatsApp page will appear.
Now you have to enter the WhatsApp business account id and access token.
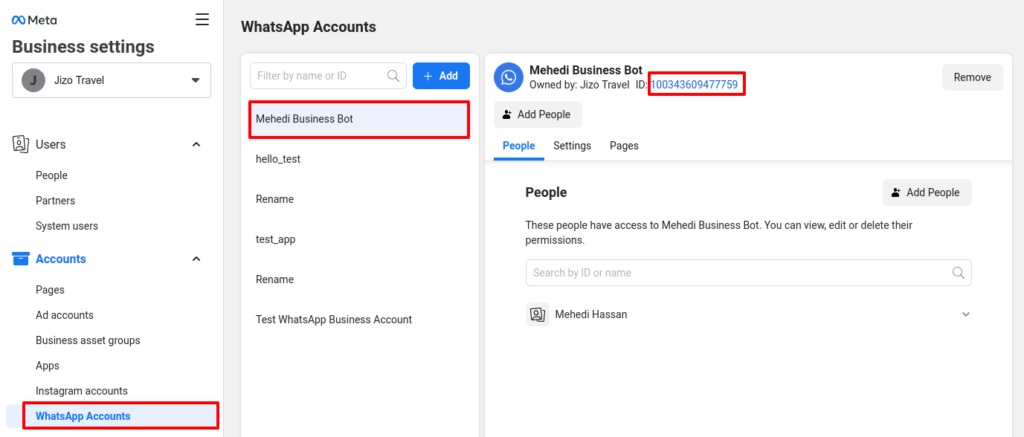
To get the WhatsApp Business Account ID, go to the Business settings page. Then at the left sidebar of the page, select the WhatsApp account menu. Instantly, the WhatsApp Accounts section will appear. Now select your app and copy the WhatsApp Business Account Id.
After entering the WhatsApp business account id and access token, click on the Connect button.
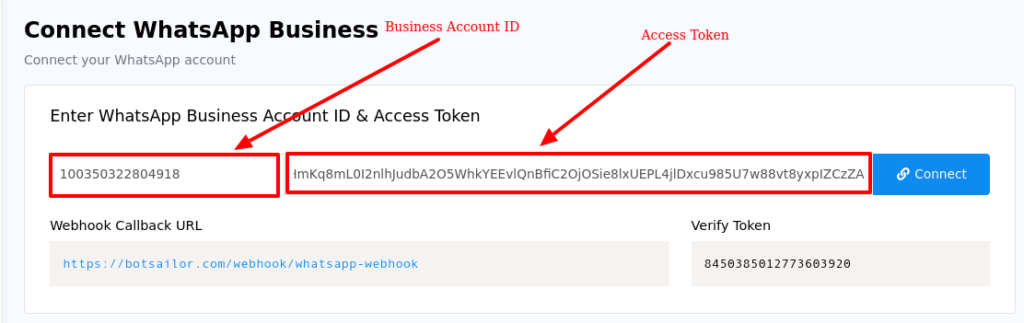
And you will see a successful message.
If your read to article mindfully and follow the instructions step by step, you can easily connect the WhatsApp bot to Botbiz easily.